Archive
Apache Pivot Label
//Create a new Apache Pivot Label
Label label = new Label();
//Set the Font:
label.getStyles().put(“font”, new Font(“Verdana”, Font.BOLD, 24);
//Set Text Color
label.getStyles().put(“color”, Color.WHITE);
//Set Horizontal Alignment of the Text within the Label.
//Options include: LEFT, RIGHT, CENTER
label.getStyles().put(“horizontalAlignment”, HorizontalAlignment.CENTER);
//Set Vertical Alignment of the Text within the Label.
//Options include: TOP, BOTTOM, CENTER
label.getStyles().put(“verticalAlignment”, VerticalAlignment.CENTER);
//Set the Background color
label.getStyles().put(“backgroundColor”, Color.RED);
//Set the Padding on all four sides (top, right, bottom, left) to
//same number of pixels. In next line = 10 pixels.
label.getStyles().put(“padding”, 10);
//Set the Padding on each side specifically:
label.getStyles().put(“padding”, “{top:5, left:15, bottom:25, right:35}”);
For example:
Labels.java
package samples.labels;

import java.awt.Color;
import java.awt.Font;

import org.apache.pivot.collections.Map;
import org.apache.pivot.wtk.*;

public class Labels implements Application {

    //************************
    //Attributes
    //************************

    /*
     * This the most basic means by which content may be
     * placed on the screen. It simply provides a blank
     * canvas in which other components may be placed.
     * In our example, we add the BoxPane to the window.
     */
    private Window window;

    /*
     * Box panes are used to arrange components. Components
     * added to box panes can be horizontal or vertically
     * stacked.
     */
    private BoxPane boxPane;

    //************************
    //Constructors
    //************************

    /**
     * Instantiate our window and box pane
     * in the default constructor.
     */
    public Labels()
    {
        window = new Window();
        boxPane = new BoxPane();
    }

    //************************
    //Methods
    //************************

    /**
     * The Application interface requires program
     * to override four methods:
     * suspend, resume, startup, shutdown.
     *
     * An interface can be thought of as a contract.
     * The Application interface promises to perform
     * these services if your program adheres to
     * the requirements.
     *
     * For example, when this program implements
     * the Application interface, it expects to find
     * these four methods. And you code within these
     * methods will be executed.
     */
    @Override
    public void resume() throws Exception
    {
        // TODO Auto-generated method stub

    }

    @Override
    public boolean shutdown(boolean arg0) throws Exception
    {
        // TODO Auto-generated method stub
        return false;
    }

    @Override
    public void startup(Display display, Map<String, String> map)
           throws Exception
    {
        //Build the Display.
        buildDisplay(display);

        //Show window.
        window.open(display);

    }

    @Override
    public void suspend() throws Exception {
        // TODO Auto-generated method stub

    }

    private void buildDisplay(Display display)
    {
        //Set boxPane to center of screen. Apply a background color,
        //Then set a vertical orientation (so labels stack).
        boxPane.getStyles().put("verticalAlignment", "CENTER");
        boxPane.getStyles().put("horizontalAlignment", "CENTER");
        boxPane.getStyles().put("backgroundColor", new Color(237,217,185));
        boxPane.setOrientation(Orientation.VERTICAL);

        //Create a label using 1-argument constructor
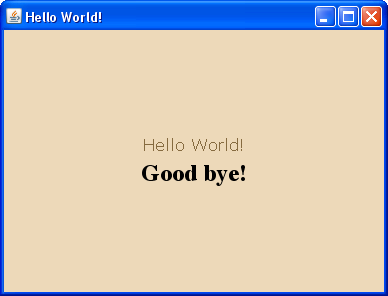
        Label helloLabel = new Label("Hello World!");

        //Set label font.
        helloLabel.getStyles().put("font", new Font("Verdana", Font.PLAIN, 16));

        //Set label font color.
        helloLabel.getStyles().put("color", new Color(134, 107, 64));

        //Add the Label to the BoxPane Layout.
        boxPane.add(helloLabel);

        //you can also use the default constructor.
        Label goodByeLabel = new Label();
        goodByeLabel.setText("Good bye!");
        goodByeLabel.getStyles().put("font", new Font("Times", Font.BOLD, 24));
        goodByeLabel.getStyles().put("color", Color.BLACK);
        boxPane.add(goodByeLabel);

        //Add the BoxPane to the window for display.
        window.setContent(boxPane);
        window.setTitle("Hello World!");
        window.setMaximized(true);
    }
}
Driver.java
package samples.labels;

import org.apache.pivot.wtk.DesktopApplicationContext;

public class Driver {

	//Entry point into all java applications.
	public static void main(String[] args) throws Exception
	{
		/**
		 * Load the pivot application into our Java program.
		 */
		DesktopApplicationContext.main(Labels.class, args);

	}
}
Use Java to convert XML and XSL to HTML Web Page
This example creates an HTML document from an xml file and xsl stylesheet. The HTML page is generated using a simple java application.
This example is based off a homework assignment I had in my advanced Java class. Specifically, i find the Driver class that creates an html file useful.
First create a valid xml document.
catalog.xml
<?xml version="1.0"?>
<catalog>
    <cd>
        <title>Empire Burlesque</title>
        <artist>Bob Dylan</artist>
        <country>USA</country>
        <company>Columbia Records</company>
        <price>10.90</price>
        <year>1985</year>
    </cd>

    <cd>
        <title>Hide Your Heart</title>
        <artist>Bonnie Tyler</artist>
        <country>UK</country>
        <company>CBS Records</company>
        <price>9.90</price>
        <year>1988</year>
    </cd>

    <cd>
        <title>Best of Enya</title>
        <artist>Enya</artist>
        <country>UK</country>
        <company>ABC Records</company>
        <price>9.90</price>
        <year>1995</year>
    </cd>
</catalog>
In the example xml file above we’ve created 3 music cd’s for our catalog. These will be rendered into a table in our HTML page. Each CD contains information including title, artist, etc. Notice the price field doesn’t contain a dollar sign ($). We will perform a test on the price field. If the price is greater than $10.00, the font is red. Otherwise, the price is green. Its not pretty but its practical.
catalog.xsl
<?xml version="1.0"?>
<xsl:stylesheet xmlns:xsl="http://www.w3.org/1999/XSL/Transform" version="1.0">
<xsl:template match="/">
<html>
<head>
<title>CD Catalog</title>
<style type="text/css">
table {
font-family: verdana;
}
tr {
height: 30px;
}
td.col1 {
width: 100px;
}
td.col2 {
width: 400px;
}
td.title {
background: #efe7d9 ;
border-bottom: 1px solid #336699;
font: 16 verdana;
padding: 0 0 0 15px;
}
.red {
color: #ff0000;
}
.green {
color: #249821;
}
td.greenRow
{
background: #d6efd6;
border-bottom: 1px solid #437841;
}
</style>
</head>
<body>
<table>
<xsl:for-each select="catalog/cd">
<!-- if artist is assigned enya, set bg to green. -->
<tr>
<xsl:choose>
<xsl:when test="artist = 'Enya'">
<td colspan="2" class="greenRow">
<xsl:value-of select="title" />
</td>
</xsl:when>
<xsl:otherwise>
<td colspan="2"><xsl:value-of select="title" /></td>
</xsl:otherwise>
</xsl:choose>
</tr>
<tr>
<td>Artist:</td>
<td><xsl:value-of select="artist" /></td>
</tr>
<tr>
<td>Company:</td>
<td><xsl:value-of select="company" /></td>
</tr>
<tr>
<td>Country:</td>
<td><xsl:value-of select="country" /></td>
</tr>
<tr>
<td>Year:</td>
<td><xsl:value-of select="year" /></td>
</tr>
<tr>
<td>Price:</td>
<!-- if price greater than $10, show in red.
Otherwise, show green -->
<xsl:choose>
<xsl:when test="price > 10">
<td class="green">
$<xsl:value-of select="price" />
</td>
</xsl:when>
<xsl:otherwise>
<td class="red">
$<xsl:value-of select="price" />
</td>
</xsl:otherwise>
</xsl:choose>
</tr>
</xsl:for-each>
</table>
</body>
</html>
</xsl:template>
</xsl:stylesheet>
This is the xsl style sheet. This is the template for the HTML output. Its combined with several xsl conditional statements, specifically the for each loop and the “choose, when, otherwise” statement.
<?xml version=”1.0″?>
<xsl:stylesheet xmlns:xsl=”http://www.w3.org/1999/XSL/Transform” version=”1.0″>
In line 1, notice this is an xml document. Be sure to add this line.
<?xml version=”1.0″?>
The second line is the namespace. Add this line as well.
<xsl:stylesheet xmlns:xsl=”http://www.w3.org/1999/XSL/Transform” version=”1.0″>
In my opinion, the two lines above should be accepted for what they are and move on. For more information please reference the vast articles available.
<xsl:template match=”/”>
On the next line, you will notice the <xsl:template match=”/”></xsl:template>. The code embedded in the xsl:template nodes is your html + xsl commands. The attribute match=”/” references back to the root element of catalog.xml.
The root element in our example above is <catalog></catalog>. This style sheet will begin looking within the root element allowing us access to <cd></cd> node.
Building the table output
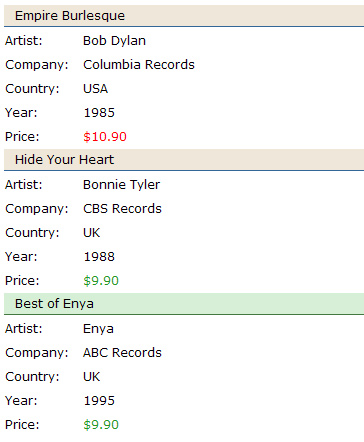
Naturally a table is data rendered in an easy to read format. In our example we create a table that looks like this:
We begin by creating a basic html table with no rows or columns.
<table></table>
Inside this table is where we loop through each node in the xml file. Each CD will have its own layout with title and other basic information. This loop creates each row appending the node information.
<xsl:for-each select=”catalog/cd”>
To accomplish this we use the for-each loop construct. A for each loop will loop through all nodes that we selected. As shown in the example below, the for each loop construct begins with the xsl tag prefix and select attribute.
The select attribute tells the for-each loop what you are looping through. We are interested in all CDs so we filter down to the cd. Separate each node with a slash. Looking back at our example, notice that catalog is the root xml element. The next node is cd. Hence catalog/cd will loop us through each CD where we can obtain all nodes within the cd. This includes artist, company, etc.
<xsl:choose>
<xsl:when test=”artist = ‘Enya'”>
<td colspan=”2″><xsl:value-of select=”title” /></td>
</xsl:when>
<xsl:otherwise>
<td colspan=”2″><xsl:value-of select=”title” /></td>
</xsl:otherwise>
</xsl:choose>
In the photo if you will notice that Enya is green. This is accomplished by the choose, when, otherwise construct. This is similar to a switch statement in java or select case in visual basic. This allows you to test for several situations and respond accordingly.
In my example, I am setting the background of the table row to green if the artist is Enya. A practical application might be to highlight a product that is on sale. In the example above, i test if the value of our node (<artist></artist>) equals “Enya”. If so, we display green background, otherwise we display default background color.
Notice I have done the same for the price. if the price is greater than $10.00 we display the output in red. If the price is less than $10.00, green font is used.
<xsl:value-of select=”title” />
To retrieve the content between the xml tags <artist>Enya</artist>, use xsl:value-of. For example, to retrieve the title of a CD, we use the <xsl:value-of tag and set the select attribute to title. This is the name of the node we are interested in (<title></title>).
Convert XML and XSL to HTML using Java
package xmlToHtml;

import java.io.*;
import javax.xml.transform.*;
import javax.xml.transform.stream.*;

public class Driver {

    public static void main(String[] args)
    {
        try
        {
            TransformerFactory tFactory = TransformerFactory.newInstance();

            Source xslDoc = new StreamSource("src/xmlToHtml/catalog.xsl");
            Source xmlDoc = new StreamSource("src/xmlToHtml/catalog.xml");

            String outputFileName = "src/xmlToHtml/catalog.html";
            OutputStream htmlFile = new FileOutputStream(outputFileName);

            Transformer transformer = tFactory.newTransformer(xslDoc);
            transformer.transform(xmlDoc, new StreamResult(htmlFile));
        }
        catch(Exception e)
        {
            e.printStackTrace();
        }
    }
}
And here is the code used to create an html file from the catalog.xml and catalog.xsl documents. In the code above, note that I create a stream source for both the xml and xsl files. Next an output stream is created which renders the proper html.
As you can see by my package name “xmlToHtml” and the relative paths to my xml and xsl files, I have my project files located in /src/xmlToHtml/ folder. Adjust this accordingly to suit your needs.
And the output generated from the java file:
catalog.html
<html>
<head>
<META http-equiv="Content-Type" content="text/html; charset=UTF-8">
<title>CD Catalog</title>
<style type="text/css">
	table {
		font-family: verdana;
	}

	tr {
		height: 30px;
	}

	td.col1 {
		width: 100px;
	}

	td.col2 {
		width: 400px;
	}

	td.title {
		background: #efe7d9 ;
		border-bottom: 1px solid #336699;
		font: 16 verdana;
		padding: 0 0 0 15px;
	}

	.red {
		color: #ff0000;
	}

	.green {
		color: #249821;
	}

	td.greenRow
	{
		background: #d6efd6;
		border-bottom: 1px solid #437841;

	}
</style>
</head>
<body>
  <table>
    <tr>
        <td class="title" colspan="2">Empire Burlesque</td>
    </tr>
    <tr>
        <td class="col1">Artist:</td><td class="col2">Bob Dylan</td>
    </tr>
    <tr>
        <td class="col1">Company:</td><td class="col2">Columbia Records</td>
    </tr>
    <tr>
        <td class="col1">Country:</td><td class="col2">USA</td>
    </tr>
    <tr>
        <td class="col1">Year:</td><td class="col2">1985</td>
    </tr>
    <tr>
        <td class="col1">Price:</td><td class="col2 red">$10.90</td>
    </tr>
    <tr>
        <td class="title" colspan="2">Hide Your Heart</td>
    </tr>
    <tr>
        <td class="col1">Artist:</td><td class="col2">Bonnie Tyler</td>
     </tr>
     <tr>
        <td class="col1">Company:</td><td class="col2">CBS Records</td>
    </tr>
    <tr>
        <td class="col1">Country:</td><td class="col2">UK</td>
    </tr>
    <tr>
        <td class="col1">Year:</td><td class="col2">1988</td>
    </tr>
    <tr>
        <td class="col1">Price:</td><td class="col2 green">$9.90</td>
    </tr>
    <tr>
        <td class="title greenRow" colspan="2">Best of Enya</td>
    </tr>
    <tr>
        <td class="col1">Artist:</td><td class="col2">Enya</td>
    </tr>
    <tr>
        <td class="col1">Company:</td><td class="col2">ABC Records</td>
    </tr>
    <tr>
        <td class="col1">Country:</td><td class="col2">UK</td>
    </tr>
    <tr>
       <td class="col1">Year:</td><td class="col2">1995</td>
    </tr>
   <tr>
       <td class="col1">Price:</td><td class="col2 green">$9.90</td>
    </tr>
</table>
</body>
</html>
Apache Pivot Class Instances
BXML allows you to create your objects and set the class attributes all within a BXML document. There are a few things to keep in mind. To create an object, the element that defines the instance of your class must start with a capital letter. The BXML Serializer object will interpret XML tags that begin with a capital letter as objects.
Secondly, the serializer object requires you to specify the namespace in which the object is defined. A traditional Swing JLabel, for example, is defined in the javax.swing package. You are able to define your own custom objects as well.
For example…
Company B has created a custom object representing a Person to be used in their Java GUI. The person class has two attributes of type String: First and Last Name. They have created getters and setters and the Person object is ready for use. In the BXML document an instance of the Person class is defined and first and last name properties are set. When a Person object is instantiated, the BXMLSerializer will populate a Person object into the Java application.
Exploring this example, lets create the Person object. Here is a class that represents our Person.
Person.java
/**
* This class represents a person object.
*/
package logic;

public class Person {

    //Attributes
    private String firstName;
    private String lastName;

    //Constructors
    public Person()
    {
        this.firstName = "";
        this.lastname = "";
    }

    public Person(String firstName, String lastName)
    {
        this.firstName = firstName;
        this.lastName = lastName;
    }

    //Getters & Setters
    public String getFirstName() {
        return firstName;
    }

    public void setFirstName(String firstName) {
        this.firstName = firstName;
    }

    public String getLastName() {
        return lastName;
    }

    public void setLastName(String lastName) {
        this.lastName = lastName;
    }
}
Now that our person object is created we define a Person object and set the parameters in the BXML file. This is the information that will be passed in our Person object when we run the BXMLSerializer’s readObject method. That’s how the xml data creates the person object. At that point we can manipulate the Person object.
Person.bxml
<Person
    xmlns:bxml="http://pivot.apache.org/bxml"
    xmlns="logic">
    <firstName>Peter</firstName>
    <lastName>Griffin</lastName>
</Person>
<Person></Person> Element
As you see above, this example defines an instance of a Person object. Notice this instance begins with a capital P for Person. The BXML Serializer will interpret this as an object instance. Remember to close the instance of the Person element using </Person>. If you don’t you end up with malformed XML that will generate the error
javax.xml.stream.XMLStreamException: ParseError at
[row,col]:[6,1] Message: XML document structures must
start and end within the same entity.
To fix this error, make sure you have the opening and closing element tags. In our example: <Person></Person>
xmlns:bxml=”http://pivot.apache.org/bxml”
The second line of the Person.bxml file defines the namespace of the xml. This is used for internal processing. Add this line of code to the root element of your bxml documents.
xmlns=”logic”
Also notice the second XML namespace that is defined. The XML namespace is denoted as xmlns=””. This tells the compiler where to find the definition of the class Person. In my example, the Person class is in a package called “logic”. Since the Person class is defined in logic.Person package, we only enter logic in the namespace. The class name is defined in the root element name <Person>. Pivot will combine the two to create the logic.Person object.
<firstName>Peter</firstName>
And lastly we set the attributes of the class – firstName and lastName. Pivot will automatically call the setters for these attributes. This is equivalent to:
//Instantiate a Person Object
Person myPersonObject = new Person();

//Set the First and Last Names using Setter Methods.
myPersonObject.setFirstName("Peter");
myPersonObject.setLastName("Griffin");
The Person.java class and the Person.bxml document are both completed. Now its time to build the Java program. The java program is created in two class files:
Driver.java – this is the entry point of all java programs including this one. This is where you load the Pivot application into a java program.
TestPerson.java – This class defines the User Interface and works with the BXML document (in our case: Person.bxml).
Driver.java
/**
* This class represents the entry point into an
* Apache Pivot application on the desktop.
*/

package demoApplication;

//Import the DesktopApplicationContext package.
import org.apache.pivot.wtk.DesktopApplicationContext;

public class Driver {

    //Entry point into all java applications.
    public static void main(String[] args) throws Exception
    {
        /**
        * Load the pivot application into our Java program.
        * Remember to enter correct class in the parameter list..
        */
        DesktopApplicationContext.main(TestPerson.class, args);

    }
}
In the driver class above, please note a few points:
- The org.apache.pivot.wtk.DesktopApplicationContext import is required in this class.
- The main method of the Desktop Application Context class is has two parameters:
- The first parameter is the class file that implements the Application interface. This is required.
- The second parameter is the list of arguments passed in via command line interface. This can be ignored if you are not using the command line to run your program.
TestPerson.java
/**
* This class implements the Application interface which is
* the foundation for your Apache Pivot desktop programs.
* This is where you import your bxml files and build the
* program user interface.
*/
package demoApplication;
/**
* Import the person class. Notice how this matches up to the
* xmlns namespace in the Person.bxml document.
*/
import logic.Person;
/**
* The necessary Pivot imports that this class needs to run.
*/
import org.apache.pivot.beans.BXMLSerializer;
import org.apache.pivot.collections.Map;
import org.apache.pivot.wtk.*;

/**
* This class must implement the Application Interface. This
* interface requires you to override four methods:
* startup
* shutdown
* suspend
* resume
*/
public class TestPerson implements Application {

    //Attributes
    private Person person; //The person object for testing bxml serializer
    private Window window; //Currently not being used

    /**
    * The Application startup method is where to put your code for rendering UI.
    * The startup method requires the throws Exception to prevent an error
    * when trying to read to the bxml document. This handles the Serialization
    * Exception thrown if file not found.
    */
    @Override
    public void startup(Display display, Map<String, String> properties)
        throws Exception {

        //Create and instantiate a new BXML Serializer object.
        //This is used to read and process the bxml documents.
        BXMLSerializer bS = new BXMLSerializer();

        //Next, we call the read object method to read the bxml document.
        //Several things are happening here.

        //First we get the Person.bxml resource which is retrieved using
        //getClass().getResource() method. The resource is the Person.bxml file

        //Second, we read the xml data from the retrieved file. In this case
        //the BXML Serializer will cast our person object defined in the bxml
        //document into an object of type Object.

        //Third we must cast the object that was returned from the BXML
        //Serializer into a Person object. That is accomplished using
        //casting. Casting is implemented with the (Person). And finally
        //we assign the newly created Person object into our variable called
        //"person". Now we can reference the attributes set in the bxml document.
        person = (Person) bS.readObject(getClass().getResource("Person.bxml"));

        //Print the First and Last Name.
        String name = person.getFirstName() + person.getLastName();
        System.out.println("Name is: " +  name);
    }

    @Override
    public boolean shutdown(boolean optional) {
        if (window != null) {
          window.close();
        }
        return false;
    }

    @Override
    public void suspend() { }

    @Override public void resume() { }
}
In the example above, the TestPerson class implements the Application interface which is required for the Apache Pivot application to run. The application interface defines four methods:
startup – This is the method you will use the most. Place all your code that runs as the application starts up here. For example, this is where the user interface for the GUI application is built.
shutdown – This is where you close the application.
resume and suspend – ignore for now.
Imports
There are at least three imports used in a basic Pivot application:
org.apache.pivot.beans.BXMLSerializer
This containts the BXML Serializer used to retrieve and convert objects from the bxml documents.
org.apache.pivot.collections.Map;
This contains the Map class defined in the parameter list of the startup method.
org.apache.pivot.wtk.*;
This is the entire wtk package. This contains most of the UI elements you will use in your program.
In the startup method, I have created an instance of the BXMLSerializer object to retrieve the Person.bxml document. I cast the object that is return into a Person object and print the first and last name to the console. This program demonstrates how to build a desktop java application using the Apache Pivot framework. It also demonstrates how to create and access a class instance in the BXML document.
How to use Include Files in Apache Pivot BXML Documents
Apache Pivot platform offers a useful method of simplifying your bxml documents. BXML is a markup language that is used for designing the GUI of a rich Java desktop application.
BXML offers an alternative to the traditional Java Swing GUI development. BXML uses a markup language that web designers can adapt to quickly.
Include files have been around for years in other web design technologies. An include file allows you to extract content from your document and save in an alternate location.
In BXML for example, you can separate a section of markup and save in another file using the bxml:include tag. This allows for reusable content, structuring large applications into manageable pieces and divide coding responsibilities between multiple developers.
In this silly example, we mimic a Tic Tac Toe board (no functionality). This example demonstrates the benefits of re-usability and simplicity. In the example below you might see how your layout markup can get complicated fast.
<!-- BEGIN BXML LAYOUT -->
<Window title="Application Title"
        maximized="true"
        xmlns:bxml="http://pivot.apache.org/bxml"
        xmlns="org.apache.pivot.wtk">

    <GridPane columnCount="3"
        styles="{ verticalSpacing:1,
            showHorizontalGridLines:true,
            horizontalSpacing:1,
            showVerticalGridLines:true}"
        xmlns:bxml="http://pivot.apache.org/bxml"
        xmlns="org.apache.pivot.wtk">
        <GridPane.Row>
            <Label xmlns:bxml="http://pivot.apache.org/bxml"
                xmlns="org.apache.pivot.wtk"
                text="O"
                styles="{font:'Arial bold 64', color:'#ff0000',
                horizontalAlignment:'center', verticalAlignment:'center'}" />
            <Label xmlns:bxml="http://pivot.apache.org/bxml"
                xmlns="org.apache.pivot.wtk"
                text="O"
                styles="{font:'Arial bold 64', color:'#ff0000',
                horizontalAlignment:'center', verticalAlignment:'center'}" />
            <Label xmlns:bxml="http://pivot.apache.org/bxml"
                xmlns="org.apache.pivot.wtk"
                text="X"
                styles="{font:'Arial bold 64', color:'#ff0000',
                horizontalAlignment:'center', verticalAlignment:'center'}" />
        </GridPane.Row>
        <GridPane.Row>
            <Label xmlns:bxml="http://pivot.apache.org/bxml"
                xmlns="org.apache.pivot.wtk"
                text="O"
                styles="{font:'Arial bold 64', color:'#ff0000',
                horizontalAlignment:'center', verticalAlignment:'center'}" />
            <Label xmlns:bxml="http://pivot.apache.org/bxml"
                xmlns="org.apache.pivot.wtk"
                text="X"
                styles="{font:'Arial bold 64', color:'#ff0000',
                horizontalAlignment:'center', verticalAlignment:'center'}" />
            <Label xmlns:bxml="http://pivot.apache.org/bxml"
                xmlns="org.apache.pivot.wtk"
                text="O"
                styles="{font:'Arial bold 64', color:'#ff0000',
                horizontalAlignment:'center', verticalAlignment:'center'}" />
        </GridPane.Row>
        <GridPane.Row>
            <Label xmlns:bxml="http://pivot.apache.org/bxml"
                xmlns="org.apache.pivot.wtk"
                text="X"
                styles="{font:'Arial bold 64', color:'#ff0000',
                horizontalAlignment:'center', verticalAlignment:'center'}" />
            <Label xmlns:bxml="http://pivot.apache.org/bxml"
                xmlns="org.apache.pivot.wtk"
                text="O"
                styles="{font:'Arial bold 64', color:'#ff0000',
                horizontalAlignment:'center', verticalAlignment:'center'}" />
            <Label xmlns:bxml="http://pivot.apache.org/bxml"
                xmlns="org.apache.pivot.wtk"
                text="X"
                styles="{font:'Arial bold 64', color:'#ff0000',
                horizontalAlignment:'center', verticalAlignment:'center'}" />
        </GridPane.Row>
    </GridPane>
</Window>
<!-- END BXML LAYOUT -->
The code above is 65 lines long as I have it in Eclipse. As you can see, its getting lengthy and we only put several labels on the screen. Lets simplify it…
<!-- Begin BXML LAYOUT -->
<Window title="Application Title"
        maximized="true"
        xmlns:bxml="http://pivot.apache.org/bxml"
        xmlns="org.apache.pivot.wtk">

    <GridPane columnCount="3"
        styles="{ verticalSpacing:1,
            showHorizontalGridLines:true,
            horizontalSpacing:1,
            showVerticalGridLines:true}"
        xmlns:bxml="http://pivot.apache.org/bxml"
        xmlns="org.apache.pivot.wtk">
        <GridPane.Row>
            <bxml:include src="LabelO.bxml" />
            <bxml:include src="LabelO.bxml" />
            <bxml:include src="LabelX.bxml" />
        </GridPane.Row>
        <GridPane.Row>
            <bxml:include src="LabelO.bxml" />
            <bxml:include src="LabelX.bxml" />
            <bxml:include src="LabelO.bxml" />
        </GridPane.Row>
        <GridPane.Row>
            <bxml:include src="LabelX.bxml" />
            <bxml:include src="LabelO.bxml" />
            <bxml:include src="LabelX.bxml" />
        </GridPane.Row>
    </GridPane>
</Window>
<!-- END BXML LAYOUT -->
Now we have 29 lines of code. Better! As you look closer to what I have done you will notice I replaced the markup for each label with an include file. This simplifies the markup quite a bit.
Lets have a look at LabelX.bxml and LabelO.bxml. Both of the files have the same markup except for text value which is X or O.
<!-- BEGIN LABEL X "LabelX.bxml" -->
<Label xmlns:bxml="http://pivot.apache.org/bxml"
    xmlns="org.apache.pivot.wtk"
    text="X"
    styles="{font:'Arial bold 64', color:'#ff0000',
    horizontalAlignment:'center', verticalAlignment:'center'}" />
<!-- END LABEL -->
<!-- BEGIN LABEL O "LabelO.bxml" -->
<Label xmlns:bxml="http://pivot.apache.org/bxml"
    xmlns="org.apache.pivot.wtk"
    text="O"
    styles="{font:'Arial bold 64', color:'#ff0000',
    horizontalAlignment:'center', verticalAlignment:'center'}" />
<!-- END LABEL -->
There we have it. We are using the <bxml:include> tag to help simplify our bxml markup. You should consider using the includes to help structure your GUI application as it grows.
You might want to organize your include files into a logical directory. Lets say we moved the labels to a folder conveniently called “Labels”. To reference these nested includes in your layout bxml markup, use a relative path.
<bxml:include src="/Labels/LabelX.bxml" />
Setup Apache Pivot in Eclipse IDE
Sometimes it can be daunting to get your Hello World application up and running. If you are like myself, you have absolutely no experience in Apache Pivot and you are having trouble getting your first program to run on the desktop. To get your first application working requires a few small steps.
Download and install the Apache Pivot jar files.
To be able to create a program using the Apache Pivot framework, you need to download the files. These files that allow you to run your program are stored in several jar files.
A jar file is similar to a zip file for windows. It simply is a directory of files that have been compressed to save on space. You do not need to extract the files from the jar file.
Lets get started…
Point your browser to the Apache Pivot website. Click on the downloads link. First you may notice the downloads web page mentions a few topics: Release Integrity, Mirrors, Binary Distributions and Source Code Distributions.
For now you can ignore the release integrity, mirrors and Source Code Distributions. Release integrity verifies your download has not changed during the transfer. This is a security feature. The default mirror location should be sufficient. You may choose another source to download from. Source code distributions require you to compile the source code before using the files.
Under the heading Binary Distributions, you are able to choose the type of file format for downloading the Apache Pivot jar files. For windows, select zip. The options for pgp, md5 and sha are all types of encryption. You can validate your installation hasn’t been altered.
Click the link “zip” to begin downloading.
Open Eclipse and create a new folder (where to save jar files).
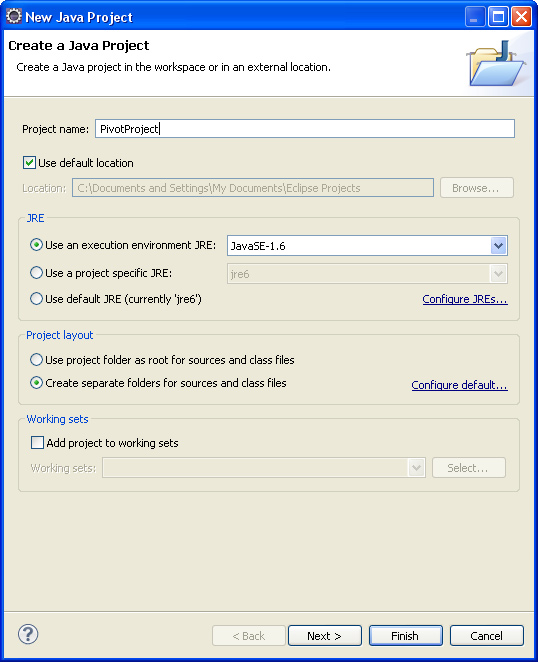
Open your Eclipse IDE. Create a new project called PivotProject.
File > New Java Project
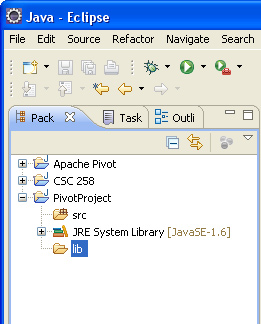
In the project Explorer, Right Click “PivotProject”, the project name and create a new folder. Name this folder lib. It should be located under the root of the project (not any sub folders).
Copy / paste the jar files into your project.
To keep things simple we will copy the Apache Pivot jar files you just downloaded into the lib folder of your project. Go ahead and open the downloaded zip folder.
As of version 2.0, the jar files are saved in the apache-pivot-2.0/lib/ folder. Open the lib folder in the download and copy all jar files into your project lib folder. This is located at PivotProject/lib/ if you used the same naming convention.
Add the jar files to your project
You’re almost done! In this final step you tell the Eclipse IDE where to find your Apache Pivot Jar files. Lets finish up…
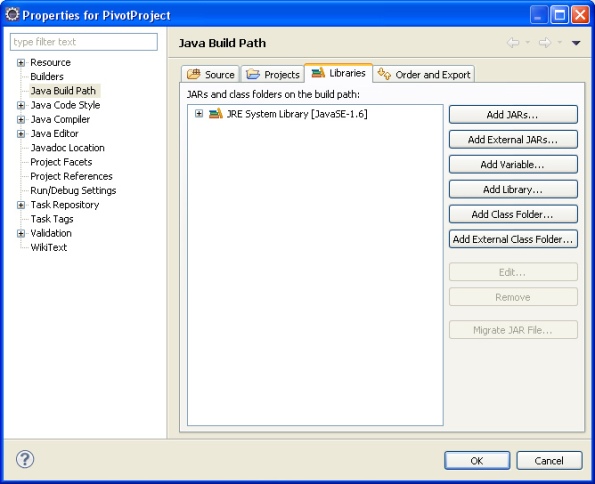
In the Eclipse IDE, under the main menus; open the “Properties for PivotProject” dialog window. After the Properties dialog window opens, notice the TreeList on the left and the content area on the right.
In the TreeList view, select Java Build Path (third option as shown below). This loads the Java Build Path options with tabbed options as shown below. Choose the Libraries tab. Click the button to “Add External JARs…” to add external jars.
Project > Properties > Java Build Path > Libraries > Add External JARs…
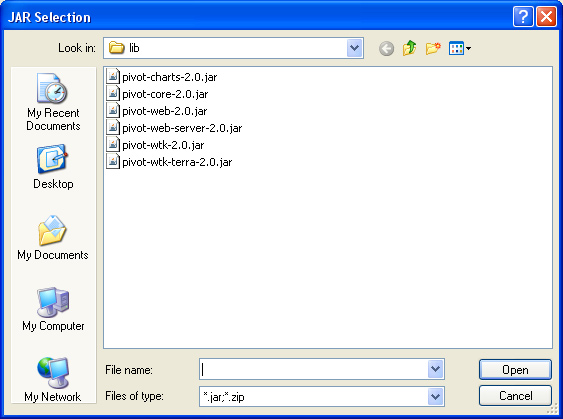
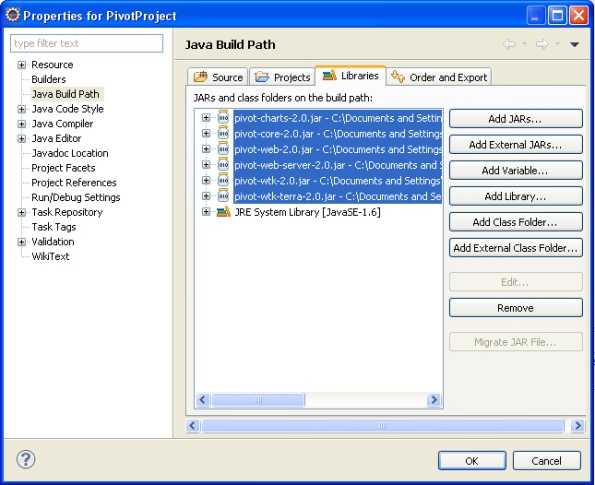
Select to add all the jar files. This makes it easier on yourself so you do not have to add the others at a later time. Look for these jar files in the lib folder you created within your project as explained above. This helps keep your project tidy. Once all are selected, click open in the JAR Selection dialog box to load these jar files.
Now that you have the Apache Pivot jar files selected, you are ready to begin your first Apache Pivot desktop application. Choose OK in the Properties Window to close.
Success!
Congratulations, you have added the Apache Pivot jar files to your project. You are ready to begin your first program.
