MySQL Workbench SSH Connection on Joyent Server
Here is how I was able to setup MySQL Workbench to manage the MySQL databases on my Joyent SmartOS web server.
In my opinion, the most confusing part I had to understand was creating a MySQL user that connects “locally”. By locally, I mean the user that is created is connecting from the server itself. This is in contrast to what I was expecting which was creating a user that connects from a remote location (work or home).
What you will need to know:
Public IP Address – Your public IP Address was assigned to you by Joyent when you provisioned your machine. This can be found in your Joyent Cloud administration located under Machines tab. I will use 64.65.66.100 in this example.
SSH Hostname – This will be your public IP Address combined with port #22. Port 22 is typically the SSH port. In this example, the hostname is 64.65.66.100:22.
SSH Username and Password – The username/password of the account you will use to SSH into your Joyent machine. For example, I will use the admin account which has some elevated privileges.
MySQL Hostname – Enter your public IP address here. I am assuming that MySQL server is installed on the same server.
MySQL Server Port – Typically this is 3306. You can validate this by checking the configuration file. See below.
Username & Password – Enter the username and password of the MySQL user here. Since we are using SSH to securely connect to the server, the MySQL user is going to be a local user. Again this is local to the Server, not to the remote location you are connecting from. See below. In this example, the username is ‘yourUserName@abc123.local’.
Check which port number MySQL Server is using:
SSH into your server and view your MySQL configuration file. If you aren’t sure where it is located – use the find command.
#Use the find command to locate my.cnf
sudo find / -name my.cnf 2>/dev/null
#Open the configuration file to find the port number.
sudo vi /etc/my.cnf
You will see the port number in two locations. Honestly, I am not sure the difference but I suspect it relates to the client and mysql daemon. You should see: port = 3306 in either case. At this time, I am not interested in researching it.
Create a “local” MySQL user:
At your terminal window prompt, connect to MySQL server to create a new user.
#First find the local hostname (in this example is abc123.local). Type
#the hostname command at terminal prompt. The output is used in your
#MySQL username.
$ hostname
$ abc123.local
$ _
#Connect to MySQL Server
$ mysql -u root -p
#Create a user
mysql> create user ‘yourUserName’@’abc123.local’ identified by ‘password’;
#Grant Privileges
mysql> grant all privileges on *.* to ‘yourUsername’@’abc123.local’ identified by ‘password’;
Set your bind address:
You will need to set the bind address to the public IP address. I’ve read on the web that there should not be a bind address of 127.0.0.1. I don’t understand why. So I have changed it to the public IP address.
#Open the configuration file for editing.
sudo vi /etc/my.cnf
#Change the bind-address value to the public IP Address. Save and quit.
bind-address = 64.65.66.100
In MySQL Workbench, Create a new Server Instance Profile:
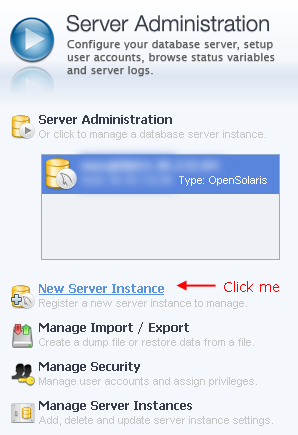
1. In MySQL Workbench, click the “New Server Instance” link to create a connection to your server.
2. Choose “Remote Host” and enter the Joyent public IP address. Click next.
3. Fill out the connection details below.
| Connection Name: | Change to a meaningful name if you like. Ex: “My Connection” |
| Connection Method: | Choose Standard TCP/IP over SSH |
| SSH Hostname: | Set to public IP address |
| SSH Username: | Enter username of your SSH account. I used admin in this example. |
| SSH Password: | Store the password of the user in the vault. |
| SSH Keyfile: | I kept blank. |
| MySQL Hostname: | Set to the public IP address |
| Username: | Set to the username you created. Use only the username (without hostname appended). For example, if the MySQL user is “yourUserName@abc123.local”, use “yourUserName” here. In the photo below I used “you@abc123.local” which is the same idea. |
| Password: | Store the password in vault. In this example, I set the password to “password”. See SQL scripts. |
| Default Schema: | I kept blank. |
4. Proceed through rest of the Setup wizard…
Hopefully you should be ready to start querying the database. You can do so by double clicking the Connection located under SQL Development on the Home Tab.


